
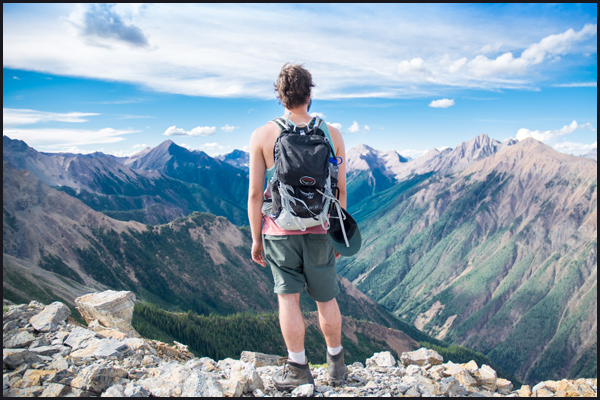
8 Deadly Hiking Factors Often Overlooked

Hiking the outdoors can be a fulfilling and memorable experience. However, the lack of situational awareness and overlooking certain factors can result in a rescue or even a fatality. Here are eight factors that should be considered for every hike to keep you safe.
Altitude
Changes in altitude can greatly affect a hiker. As the altitude increases, the oxygen levels in the air diminish exponentially. Air at 16,000 feet for example contains about half the oxygen of air at sea level where the human body preforms at its best.
The International Society for Mountain Medicine recognizes 3 stages of high altitude (ISMM 2011):
- High Altitude = 1,500–3,500 meters (4,900–11,500 ft)
- Very High Altitude = 3,500–5,500 meters (11,500–18,000 ft)
- Extreme Altitude = above 5,500 meters (18,000 ft)
When the body is exposed to higher altitudes than it is used to it will react by (ISMM 2016):
- Urinating more often
- Waking up often during the night
- Hyperventilating
- Changed breathing pattern
- Experiencing shortness of breath
Acclimatization
The human body requires time to acclimatize to the lower accessibility of oxygen. This process can take anywhere from a few days to a few weeks.
There are many mountain peaks over 14,000 feet that have trails all the way to the top. As you climb higher, expect the following changes.
- Slower Pace
- Deeper Breathing
- Increased Fatigue
- Altitude Sickness
- Increased sun exposure
- Rapid changes in weather
Acute Mountain Sickness (AMS)
AMS is the most mild form of altitude sickness and unfortunately feels very similar to a hangover. You may experience a headache, nausea, or feel exhausted. If you notice any of these symptoms, heed warning that they could predict a larger risk. About 75% of people that hike over 10,000 feet will experience some mild AMS symptoms. Symptoms mirror other hiker conditions such as dehydration or fatigue. They include:
- Disorientation
- Loss of Coordination
- Headache
- Nausea
Ignoring these symptoms can result in extreme situations including High Altitude Pulmonary Edema (HAPE) or High Altitude Cerebral Edema (HACE) or even possibly death.
High Altitude Pulmonary Edema (HAPE)
HAPE is excess fluid in the lungs which further reduces oxygen exchange from the air to your body. The level of oxygen diminishes which can lead to impaired thinking and ultimately death. In many cases this feels as if you just had the wind knocked out of you. You may also cough up a frothy foam, which means it’s time to turn around and descend as quickly as possible.
High Altitude Cerebral Edema (HACE)
HACE is a medical condition where the brain swells with fluid because of the effects of traveling to high altitude. This usually develops over a few days but is a life-threatening situation. Symptoms include confusion, incoordination, or weird behavior. If your speech is slurring and you find yourself stumbling, you are close to death and an immediate descent is imperative.
Stay alert to your body and others in your hiking party. Identify signs and symptoms early and monitor or treat as necessary. The longer the symptoms remain, the more invasive the response will be.
Skill Level
 The more skilled the hiker, the more advanced of a hike possible. The following factors can be increased with skill:
- Pace
- Hike Duration
- More complex terrain
Plan your trek to the hiker of the lowest skill level. Don’t expect a 40 year old in good health who lives and hikes at lower altitude to be able to keep up with an avid hiker of the same age who hikes at higher altitudes.
Speak Up
Planning a hike with your friends or family but feel it is to advanced for your skill level? Let them know. It can be a safety issue. Suggest an easier trail or shorter duration.
Overexertion
Overexertion means to strain or put too much pressure on one’s self. It is closely tied to a number of other factors listed including altitude, weather, and temperature. Overexerting one’s self can lead to higher risk of injury.
Recently I posted an article describing a personal account where overexertion almost became life threatening. It could have very easily cost me my life. Looking back, I learned a great deal from the situation. It even plays a role in my belief of the importance of preparedness today. Please take a few minutes to read it here and learn from my mistakes.
Pay close attention to your body and what it is telling you. Know your limits and what you feel you can continue to handle. If you don’t feel you can make it, turn back. It is better trying again later than pushing injury or requiring a rescue.
Don’t put yourself in a situation where you can’t take care of yourself. If it reaches the point where others have to step in to help, you have pushed it too far.
Climate
Know the climate for the area you are hiking. Is it desert, arid, tropical, etc? The climate is the average course or condition of the weather at a location over a period of years as exhibited by temperature, wind velocity, and precipitation. This gives you an indicator of the weather extremes you can face along your route. While it is not the near real-time indicator of the situation, the climate will let you know the “risk” of weather swings, temperature ranges, etc.
Desert climates for example face a wide range of temperatures from 110+ degrees in the daytime to the 50’s at nights and they are usually dry with low humidity. This can change with weather patters at any given time, but is the “general” overview of the climates weather.
The Köppen Climate Classification divides the world into five major climate zones based on patterns of average precipitation, average temperature, and natural vegetation. Each is then broken down and subdivided by precipitation and temperature. Use it as a planning tool for future trips.

Credit: Ali Zifan via Wikimedia Commons
Weather
Weather is the near real-time indicator of the exposures you will face. Treat it with respect or it can kill you. Weather can be fast changing and gives limited time to shelter. Always look at the forecast before you leave and monitor the skies for signs of change throughout your trip.
Temperature
Temperature and humidity can vary widely depending on the weather patterns, time of year, and altitude. Temperature impacts how your body can cool (or warm) itself. It is important to carry enough clothing to cover the range of temperatures you expect to face and dress in layers.
Cold Weather
In cold weather, do your best and regulate clothing so that you sweat as little as possible. The wetter your base layer, the more body heat it takes to warm and evaporate that moisture to keep you comfortable. In freezing temperatures, exposed skin and your fingers and toes (even of in gloves) are at a higher risk of frostbite, so keep as much covered as possible.
Warm Weather
 In hot weather, you will sweat. Do your best to wear moisture wicking clothing and allow your skin to dry. This will help to limit chafing or risk of heat rash which can make a hike extremely uncomfortable.
Humidity & Internal Cooling
Humidity is a cascading affect coupled with temperature. It to affects how your body regulates its internal temperature. Warning…important science ahead!
As your body starts to heat, it sweats. This sweat evaporates from the skin to help cool us off (i.e. evaporative cooling). When the air already has a high moisture content (i.e. high humidity) the sweat cannot evaporate as efficiently, leaving us feeling hot, wet, and sticky.
Our body must work even harder to cool itself, which means “excessive sweating, increased rate and depth of blood circulation and increased respiration” (UPMC Health Beat, 2014). When we sweat excessively, we release water and electrolytes which we must replenish in our body to function optimally (see hydration below for more).
Why Does a Humid Cold Feel Cooler than a Dry Cold?
Anyone who has been outdoors in both dry and humid environments has felt that a 34-degree day in a humid climate can “feel” colder that a 34-degree day in a dry climate. There are a few factors at play here.
In cooler environments, a high moisture content (i.e. high humidity) does not affect our ability to cool ourselves, however it does introduce water molecules into our protective layers of clothing. Remember the “wet base layers due to sweating” we discussed previously, and how it requires more energy from our body to warm it?
The same occurs when high humidity dampens our clothing with the “invisible” moisture in the air. Because your clothing is damp, your body has to exert more energy to create a warm protective layer, therefore making it seem cooler on a humid day.
Secondly, the sun can play a significant role. On a dry sunny day, the body is warmed by radiant heating from the Sun. On an overcast day, there is less radiant heating. Since overcast days tend to be more humid, you will have less radiant heating taking place, and more moisture, making it “feel” colder.
Note that humidity is not taken into account in wind chill measurements which are discussed below. Be sure to account for the “humidity factor” when hiking in cold humid temperatures.
Apparent Temperature (Wind Chill and Heat Index)
Apparent temperature is better known to most of us as Wind Chill and Heat Index. This is a calculated measurement of how the temperature is perceived by the body and takes into account our body’s cooling and warning mechanisms.
Heat Index
The heat index is derived from a combination of temperature and humidity. Since high humidity combined with hot temperatures reduce the body’s ability to cool itself, it increases the risk of heat related illnesses such as heat stroke or heat exhaustion.
The heat index is an “estimate of the temperature (in °F) that would similarly affect the body at normal humidity (about 20 percent). For example, if the actual temperature is 100°F with 40 percent relative humidity, the heat index is 110°F, meaning the apparent temperature feels like 110°F to the body” (Iowa State University).

Credit: NOAA National Weather Service
Wind Chill
Since air motion accelerates the rate of heat transfer from a human body to the surrounding atmosphere, wind chill takes into account the portion of the cooling of a human body caused by air motion. It is derived by combination of temperature and wind speed. It is also used to identify how quickly exposed body parts can be susceptible to frostbite. For example, a 35°F temperature with a 25mph wind, will feel like 23°F to the body. Exposed skin can become susceptible to frostbite in as little as 30 minutes.

Credit: NOAA National Weather Service
Monitoring the Weather
There are a number of tools that can help you identify the weather conditions without a cellphone. A thermometer and barometer are two great additions to carry on your hike which are great indicators of changes in weather.
Thermometer
A thermometer will tell you the current temperature. Make sure it has access to the outside air, as the temp in your pack is different from the environment outside. For a thermometer, we use the compact Coghlan’s 4 Function Survival Whistle which includes a thermometer. We leave it clipped to the outside of our bag.
Barometer
A barometer will allow you to identify changes in pressure. It is a substantial indicator of weather changes a can give you a little advance warning. High pressure is an indicator of a stable atmosphere and good weather. A drop in barometric pressure indicates a low pressure system (i.e. cold front, etc) is moving in and inclement weather can be expected.
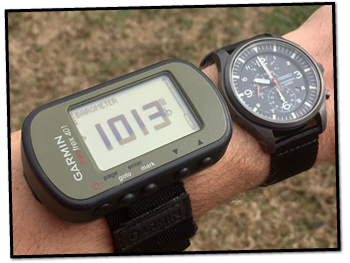 For a barometer, we use the Garmin Foretrex 401 Hiking GPS. It is a cost-effective GPS unit that includes:
- GPS tracking
- Electronic Compass
- Barometric Altimeter (i.e. a barometer)
- Uses AA batteries (so no proprietary charger is needed on long outings)
The barometric altimeter allows for monitoring of altitude changes and the current barometer reading. The unit unfortunately does not track trends in barometric pressure like it does altitude, but we just log it manually to identify changes over time to monitor weather.
Reading the Weather
Monitoring the skies and conditions around you is one of the best ways to stay a in tune to potential inclement weather. The clouds, wind, temperature, and pressure all can be monitored physically with your 5 senses. No other technical equipment required. It just takes a little knowledge and observation when out and about.
Looking Skyward: Forecasting Weather Using Nature by Outdoor Herbivore and How to Predict the Weather using Clouds by Section Hiker are two great resources to start learning about forecasting in nature.
If you prefer a book, I highly recommend, Weather: A Fully Illustrated, Authoritative and Easy-to-Use Guide (A Golden Guide from St. Martin’s Press). It is an easy read, and easy to understand for kids and adults alike.
Weather Radio
The National Oceanic and Atmosphere is Administration (NOAA) administers a nationwide network of radio stations broadcasting continuous weather information directly from the nearest National Weather Service office.
Fortunately, these channels can be picked up by most VHF radios or dual band VHF/UHF radios. Even some FRS/GMRS radios have the Weather band added into their lineup (check your user manual for the features). This allows a hiker to monitor weather forecasts, watches, and warnings across the majority of the USA with the same equipment used for group communications.
NOAA Weather Radio Coverage Map

Credit: NOAA
Just tune to one of the seven frequencies listed below to receive weather from the local forecast office.
- 162.400 MHz
- 162.425 MHz
- 162.450 MHz
- 162.475 MHz
- 162.500 MHz
- 162.525 MHz
- 162.550 MHz
Some radios feature NOAA Weather Alert so you can receive physical alerts (i.e. siren or flashing lights from your radio) as soon as a weather alert is pushed out. If your communications gear does not have this feature, special equipment or an additional radio may be required.
In our experience the combination of reading the weather by monitoring the physical changes in the sky, combined with the ability to tune in weather when needed (i.e. not alerts) is the best balance when on the trail. It saves battery life, space, and plays into the awareness of your surroundings that should always be maintained during any outing.
Hydration
 As you sweat and exert yourself, your body uses water that must be replenished. Be sure to carry enough water for your trek, include water purification tablets or a water filter in the off chance that you run out of water and have to find more on the trail.
Always carry a collapsible water bottle. It is light weight and allows you to carry additional water if your initial planned amounts were not enough.
Although hydration starts with water, it is not that simple. When you sweat, your body not only loses water, it also loses electrolytes (salts and minerals). You can drink water all day long, however if you don’t replenish electrolytes in your system you can risk developing hyponatremia (low sodium levels in the blood stream) which is just as dangerous as dehydration.
We recommend carrying a few Electrolyte Powder Packs to add a little flavor to your water and replenish lost electrolytes. Eating meals or snacks such as pretzels, nuts, trail mix, or granola bars replenish electrolytes as well.
Number of People
We recommend the “buddy system” when hiking if at all possible. This allows for one party to assist another if you run into trouble.
If you go out by yourself, make sure to have a system to call for help such as a cell phone (assuming you have coverage at your hiking location), or emergency beacon like the Garmin InReach or SPOT device.
Remember, if you are alone and become incapacitated before calling for help, no one is there to do it for you.
Pros and Cons
The more people you have, the more gear that will need to be carried. However, when traveling in groups, gear can be shared. For example, one person can carry a group tent while the other carries the cooking gear. On smaller outings, one person carries food and snacks while the other carries the extra clothing.
Use groups to your advantage to lighten the load of everyone’s packs by distributing the gear. Just make sure everyone one carries their own survival kit and water. With this method, everyone has the minimal gear to survive if one bag gets lost or destroyed (i.e. you may not have a tent, but still have an emergency bivvy to keep you warm and dry).
With the Kids
 Hiking with children is a amazing experience, but requires a higher level of awareness. Monitor children for all the signs and symptoms of overexertion we have discussed here. They do not always tell you when they start exhibiting signs and symptoms. Their mind is set on having fun.
Plan Extra Time
Take the time to teach them about the fun and the risks of hiking outdoors. Plan for additional time on the trail, your hike can be much slower with little ones tagging along.
Packing and Hauling Gear
When packing for kids, understand they will have different needs than an adult. Younger children can only carry up to 10% of their bodyweight. Even at that, it impacts their balance on the trail and increases fatigue much more than an adult.
Plan on carrying their additional gear yourself until they are of adolescent age (10-19 years). This may mean you need a larger pack or consider an internal frame to make the additional weight more comfortable for you to carry.
Topography
Topography is the arrangement of the natural and artificial physical features of an area. Or better known as the “lay of the land”. Sheer cliffs, steep climbs, steep drops, loose rocks, river/stream valleys, are all topographical hazards that require extra attention when traversing. Many of these challenges can be difficult for hikers of a lower skill level.
When planning your hike, be sure to take a look at a topographical map for the area to identify the terrain you will be facing. Bring the map with you on the trail in case you get off course or want to check your route.
Where Do You Stand?
Do you take these factors into account when hiking? Review the list and account for them while planning your next hike. It only takes a few extra minutes and could be the difference in you making it home.
Checkout our article on What to Bring on a Day Hike to Make It Home Safe to ensure you have the right supplies and a contingency plan if things go wrong.